UNIS is installed regardless of window system type
(32-bit operating system or 64-bit operating system).
FAQ
Software
UNIS install environment
How to stop and restart UNIS service
When changing UNIS setting or DB setting, you have to restart UNIS service.
– Control Panel > Administrative Tool > Services
1. Stop UNIS services
Stop this order : UWork Service – UNIS_Server – UDBServerService
2. Restart UNIS services
Start this order : UDBServerService – UNIS_Server – UWork Service

How to set UNIS client
1. When installing UNIS, select [Client].

2. After installing client, open UNIS.ini at Computer > Local Disk(C:) > Program Files > UNIS.

3. Put server IP for UDBServer IP and UNIS_Server IP and save it.

4. Restart UNIS Service at Control Panel > Administrative Tool > Services
UNIS SQL DB Setting
– Instructions
Note: You must have administrative rights on the computer to install SQL Server Express.
Step 1: Download and install Windows Installer 3.1.
Step 2: For 32-bit platforms, download and install the 32-bit version of Microsoft .NET Framework 2.0. For 64-bit platforms (x64 and EMT64 only), download and install the 64-bit version of Microsoft .NET Framework 2.0.
– System requirements
Supported Operating Systems: Windows 2000 Service Pack 4, Windows Server 2003 Service Pack 1, Windows XP Service Pack 2
• Computer with Intel or compatible Pentium III 600 MHz or faster processor(1 GHz or faster is recommended.)
• Minimum of 192 MB of RAM (512 MB or more is recommended.)
• 525 MB of available hard disk space
– Install SQLEXPR.EXE and then SQLSever2005_SSMEE.msi
– As UNIS is not working, items to be confirmed.
1. Checking ODBC Setting
(1) Check db_owner at SQL Server Management > Security > Logins > unisuser > User Mapping.

(2) Select Enable for TCP/IP at Microsoft SQL Server > Configuration Tool > SQL Server Configuration Manager.

↓

↓

2. Check ODBC
(1) Control Panel > Administrative Tools > Data Sources (ODBC)
(2) Click [System DNS] and select UNIS.
(3) Click [Configure].

(4) Check values and then click [Next].

(5) Select the second one
Put unisuser for ID and unisamho for password.
Click [Clien Configuration].

(6) Put 1433 for Port number.

(7) Select UNIS as default data base and click [Next].

(8) Click [Finish] and test it.

↓

(9) If test result is appeares as blew, it works fine.

Setting UNIS ODBC manually
– Setting UNIS.mdb manually
1. Open ODBC Data Source Administrator
(1) 32-bit Operating System :
Computer > Control Panel > Administrative Tool > Data Sources (ODBC) 64-bit Operating System :
C:\Windows\System\syswow64 > odbcad32.exe
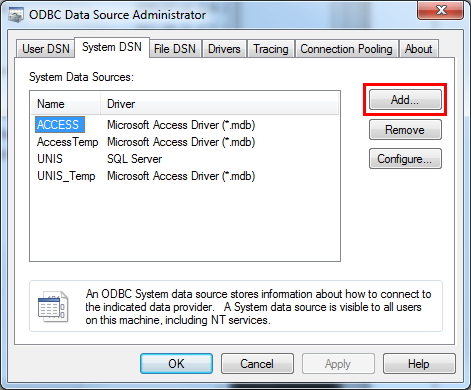
(2) ODBC Data Source Administrator > System DSN
(3) Click [Add]

2. Add ODBC Entry
(1) Select Microsoft Access Driver(*.mdb) and click [Finish]

(2) Put UNIS at [Data Source Name]. – Never change the name.

(3) Find path of UNIS folder and select UNIS.mdb and then Click [OK].
( The general path – C:\Program files\UNIS )

↓

– Setting UNIS_Temp.mdb manually
1. Open ODBC Data Source Administrator
(1) 32-bit Operating System :
Computer > Control Panel > Administrative Tool > Data Sources (ODBC) 64-bit Operating System : C:\Windows\System\syswow64 > odbcad32.exe
(2) ODBC Data Source Administrator > System DSN
(3) Click [Add]
2. Add ODBC Entry
(1) Select Microsoft Access Driver(*.mdb) and click [Finish]

(2) Put UNIS_Temp at [Data Source Name]. – Never change the name.

(3) Find path of UNIS folder and select UNIS_Temp.mdb and then Click [OK].
( The general path – C:\Program files\UNIS )

↓

If you finish to set ODBC, you can see this scree as blew.

Setting server IP
1. Setting server IP statically
(1) Computer > Contol Panel > Network and Sharing Center
(2) Click [Local Area Connection]

(3) Click [Properties]

(4) Select [Internet Protocal Version 4 (TCP/IPv4)] and click [Properties]

(5) Set IP to terminal as below

In case you don't know your server IP
1. All programs > Accessories > Command Prompt

2. Put ipconfig -all.

3. Check your server IP
4. Pur this IP to your terminal

How to set Oracle DB
1. Install Oracle Intant Client
2. Open tnsnames.ora at C > oracle > instantclient

3. Change HOST address and service name to suit your system.

4. Open Data Source (ODBC) at Conrol Panel > Administrative Tool > Data Source (ODBC)
Select System DSN and click [Add].

5. Select Oracle in instantclient 11_1.

6. Fill in the blanks as blew and click [Test Connection].

7. User Name : unisuser / Password : unisamho
Click [OK].

8. Complete to add ODBC Entry.

9. Click [Environment Variables] at Control Panel > System > Advenced system settings.

↓

![]()
How to use UNIS DB Backup file
DB is currently in use as a separate place to back-up feature. Only Access DB(.Mdb) is supported. Others DB(MS-SQL, Oacle ETC.)should be back up using the external backuo feature.
1. Excute UNIS
Click System > Databace Backup

↓
After clicking it, a popup comes up as below.

2. Stop UNIS service. (Refer to How to stop and restart UNIS service)
3. Backup path : UNIS Installation Path z9C>Program Files > UNIS)
Backup file : UNIS_date.mdb

4. Delete UNIS.mdb and then Checng the name to UNIS.

Error about UNIS server connection

1. When using UNIS V.2.5.8
(1) Excute UNIS and click [Clear Server Connect Info]
( Tool > Environment Setting > Server Environment )

(2) Click [OK].

(3) Restart UNIS.
2. When using the previous version of UNIS V.2.5.8
(1) Open UNIS.mdb
( C > Program Files > UNIS )

(2) Input database passward (unisamho) and click [OK].
(3) Excute tConnectServer.
(4) Delete all data in that table and save it.
SDK
Connection between SDK and UNIS
SDK can’t be linked with UNIS.
System Requirements for UCS
– System Requirements for UCS
CPU : Intel Pentium 133MHZ or higher
Memory : 16MB or higher
USB Port : USB1.1
OS : WIndow 98/ME or 2000/XP/2003/Vista/Window7
Module Organization
– Basic Module : UCSAPI40.dll
As a core module of UCS SDK, it is the main module that implements all functions related to communication with the terminal. This module must be included for development using UCS SDK. APIs that can be used in C/C++ are provided. Relevant sample codes can be found at the DLL folder of the Samples folder.
– COM Module : UCSAPICOM.dll
It is a COM (Component Object Module) module developed to support users of RAD (Rapid Application Development) tools such as Visual Basic and Delphi. As UCSAPICOM.dll exists ata higher level compared to UCSAPI40.dll. UCSAPI40.dll is required for operation. Also, this module does not provide all functions provided by UCSAPI40.dll but is has some functions that are not provided by UCSAPI40.dll Relevant sample codes can be found at the COM folder of the Samples folder.
– DotNET Module : UNIONCOMM.SDK.UCSAPI40.dll
This module is a class library for .NET that can be used in language for the Microsoft .NET environment such as C#, VisualBasic.NET. As in the COM module, UNIONCOMM.SDK.UCSAPI40.dll exists at a higher level compared to UCSAPI40.dll and UCSAPI40.dll is required for operation. Relevant sample codes can be found at the dotNET folder of the Sample folder.
– Winsock Engine Module : WSEngine.dll
It is the module that handle socket I/O (Input/Output). WSEngine.dll exists at a lower level compared to UCSAPI40.dll.